Before you open Webflow
Have access to the Webflow site where the calculator will live, permission to install apps, and an Enablism account. Choose a buyer outcome to model and gather the assumptions behind it. You will also need publishing permission when the page is ready to test.
Account and access requirements
Use a Webflow account with access to the destination site and permission to install apps and edit its design. Have an Enablism account with permission to configure value models in the organization you will connect. Ask the account administrator for access if model settings are unavailable.
Installing the Webflow app also requires completing the Enablism connection. Review the sites shown on the Enablism authorization screen before granting access. Keep access to both accounts while you configure and embed the calculator.
| Access | Needed for |
|---|---|
| Webflow app installation | Authorize Enablism for the intended site or Workspace. |
| Enablism model configuration | Create a model and edit its inputs and formulas. |
| Webflow Designer | Select the destination element and insert the calculator. Use the primary locale when working with Apps. |
| Webflow publishing | Publish to staging for testing, then to the intended live domain. |
1. Install Enablism on your Webflow site
Open the Enablism listing in the Webflow App Marketplace. Sign in to Webflow if the listing shows "Log in to install", then choose "Add to site". Select the site you want to work on, review the requested permissions, and choose "Authorize app".
Check the scope before authorizing. Workspace access includes its current and future sites. For a calculator on a single website, select that site when Webflow offers the choice.
Continue to Enablism after Webflow authorization and sign in or create your Enablism account when prompted. On the "Authorize Integration" screen, review the listed sites and choose "Authorize Access" to finish linking the installation to your Enablism organization.
You can also install from the Designer: open the Apps panel, search for Enablism, and choose "Install on site". Complete the same authorization flow before launching the app.
2. Launch the app and create a value model
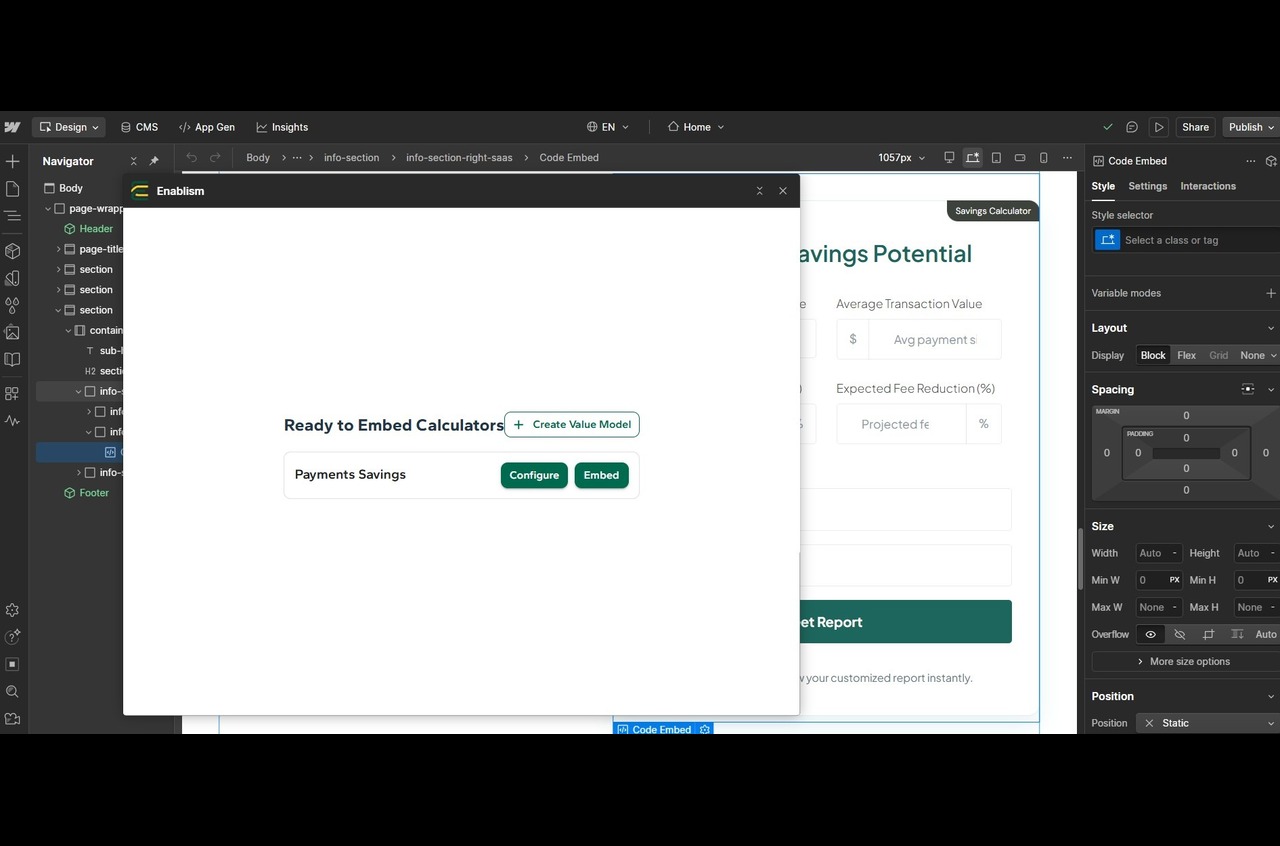
Open your site in the Webflow Designer. In the Apps panel, find Enablism and choose "Launch". Complete any Enablism sign-in prompts. The app shows a "Ready to Embed Calculators" list with a "+ Create Value Model" button.
Choose "+ Create Value Model" to open the Enablism Value Models page in a separate tab and start a calculator. Describe the product and the benefit you want a visitor to estimate. Give ValueStudio AI enough context to suggest useful inputs and calculation logic, then review the generated model before using it on your site.
For example, a payment-cost calculator could ask for monthly transaction volume and the current processing rate. State whether each output represents monthly or annual savings. To show ROI, model the full investment and calculate net benefit divided by that investment.
3. Configure the calculator
In the calculator list, choose "Configure" beside your model. This opens "Value Model Configuration" in Enablism in a separate browser tab. Check "General" for the model name and description, then use "Inputs" to review the fields and "Calculations / Formulas" to review the calculation logic.
Save each edit using the relevant form. Check units, default values and the output labels against a calculation you have worked through independently. Review any publishing warnings and publish the approved model in Enablism before testing the website.
Publishing a model can affect existing forms and lead-generation assets that use it. Review those uses before publishing changes, then return to the Webflow Designer. Publishing the Webflow page is a separate step.
Explain any benchmark the visitor is asked to accept. If you collect contact details, make the purpose clear beside the form and provide your privacy notice. Decide who will receive submissions before the page goes live.
| Check | Example | Ready when |
|---|---|---|
| Input units | Monthly transaction volume in dollars | The label and formula use the same currency and period. |
| Assumptions | Estimated change in processing cost | A reviewer can explain the source and when it applies. |
| Output label | Estimated annual savings | The displayed number agrees with the reviewed model. |
| Lead capture | Name and email for a requested report | The visitor understands what happens after submission. |
4. Embed the calculator on your page
Open the destination page in the Designer and select the element that should come immediately before the calculator. In the Enablism app window, choose "Embed" beside your configured model. The extension inserts the calculator wrapper after the selected element.
If "Embed" is unavailable, select a target element on the canvas first. Inspect the inserted wrapper in the Webflow Navigator and move it into the intended position if needed. The extension creates the wrapper and its script; keep both together.
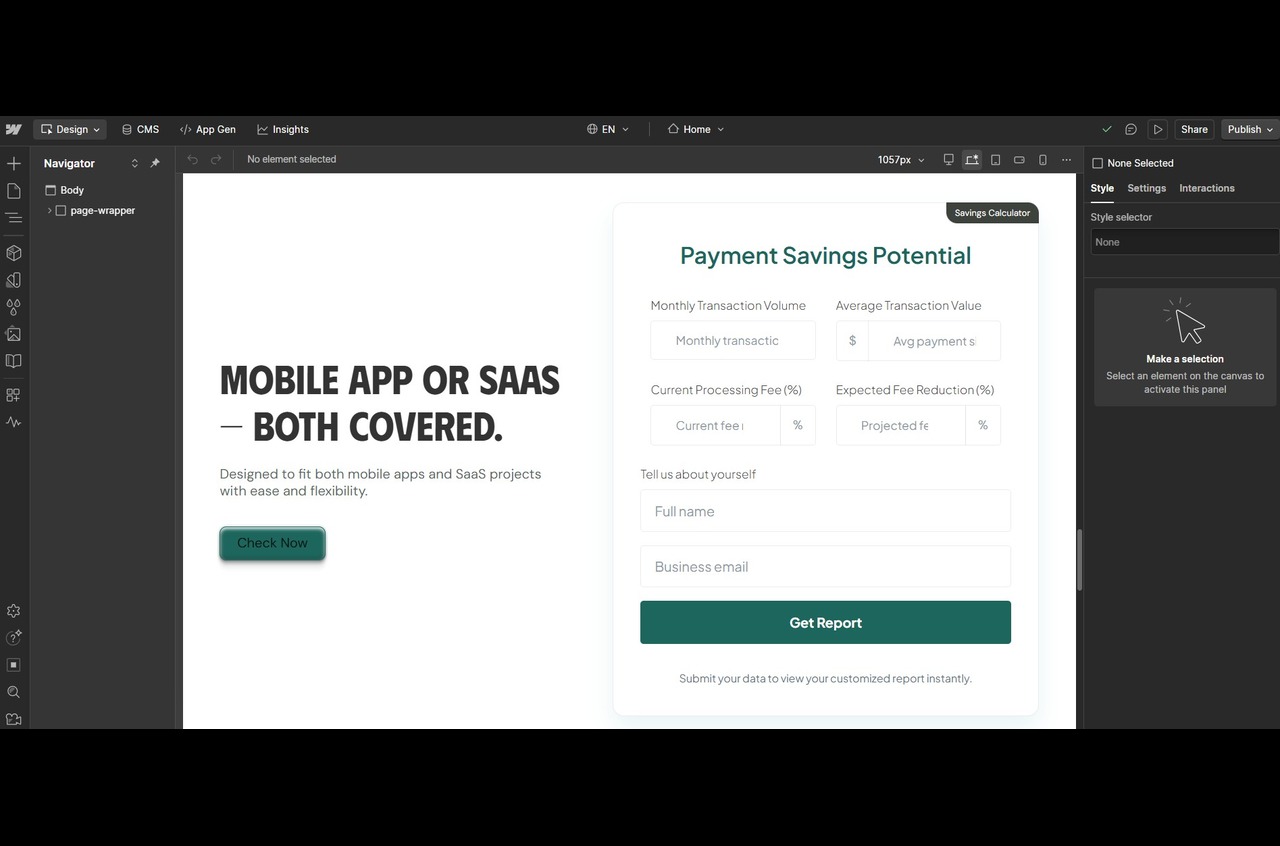
The wrapper starts at full width with a 700px height and minimum height. Check the space required by the inputs, results and report flow at each breakpoint, and adjust the wrapper in Webflow as needed.
Leave enough width for field labels and results. Check the surrounding section at mobile breakpoints, especially if the desktop layout places text beside the calculator. Keep the page heading focused on the outcome visitors can estimate.
5. Publish to staging and test the full flow
Open "Publish" in Webflow and select your webflow.io staging subdomain. Uncheck the production domain, then choose "Publish to selected domains". Open the staging URL in a fresh browser tab to test the embedded calculator.
Use test contact details you control. Check the result and any requested report, then confirm receipt in the destination you have configured. A success message on the page is only one part of this check. Verify CRM fields separately if your setup includes a CRM connection.
Calculation
Run a known scenario, then try zero and unusually large values. Check rounding and whether invalid inputs receive a useful explanation.
Mobile and keyboard
Complete the form on a phone-sized screen and using only the keyboard. Look for clipped labels, hidden results or missing focus indicators.
Submission and delivery
Confirm the expected report or follow-up arrives. Check that captured values match the scenario you submitted.
Published page
Reload the staging page and repeat the test. Check the browser console if the embed is empty or submission fails.
6. Publish to your live domain
Once the staging checks pass, review the site changes that will be published. Open "Publish", select the intended production domain and publish. Repeat a test on the live URL so you can confirm that the calculator and its connected workflow work there.
If Enablism is missing from the Apps panel, check that it is authorized for this site. For an empty embed, first confirm that the latest page was published and that the calculator is in the intended container. If a result is wrong, return to the model and compare its units and assumptions with your known scenario.
Keep a record of the model you approved and review it when pricing or customer evidence changes. Track completion and useful follow-up so you can decide which questions the calculator needs.